There are some snacks that instantly make everyone happy, and Crispy Air Fryer Cheese Bread Rolls are definitely one of them. These cheesy bread rolls are crunchy on the outside, soft from inside, and filled with warm melted cheese that stretches with every bite. They are simple to make, use everyday kitchen ingredients, and are ready in very little time.
This recipe is perfect for busy days when you want something quick but delicious. Whether you are making an evening snack for family, preparing something fun for kids, or looking for a late-night comfort snack, these crispy bread rolls are always a great choice. The air fryer gives the rolls a beautiful golden color without deep frying, making them lighter while still keeping them crispy and flavorful.
The combination of buttery toasted bread and gooey melted cheese creates a snack that feels comforting and satisfying. You can enjoy these rolls plain or customize them with herbs, garlic, chili flakes, or your favorite sauces. They are easy enough for beginners and tasty enough to serve at small gatherings or parties.
Why You Will Love These Cheese Bread Rolls
These air fryer cheese rolls are loved for many reasons:
- Super quick and easy recipe
- Requires only a few ingredients
- Crispy outside with soft cheesy center
- No deep frying needed
- Perfect for tea-time or party snacks
- Great for kids’ lunch boxes
- Easily customizable with different flavors
- Ready in around 15 minutes
- Beginner-friendly recipe
- Perfect when craving something cheesy and crunchy
Ingredients (Serves 2–3)
- 4–6 bread slices (soft sandwich bread works best)
- 4–6 cheese cubes (mozzarella, cheddar, or processed cheese)
- 2–3 tablespoons butter (melted or softened)
Ingredient Breakdown
Bread – The Crispy Outer Layer
Bread acts as the covering for the rolls. Soft sandwich bread works best because it rolls easily without breaking. When flattened and air fried, the bread becomes crispy and golden while staying light and soft from inside.
White bread is most commonly used, but you can also use brown bread or milk bread if you prefer.
Why Flattening Bread Helps
Flattening the bread:
- Makes it flexible
- Helps create tight rolls
- Prevents cracks while rolling
- Keeps cheese safely inside during cooking
Cheese – The Gooey Filling
Cheese is the heart of this recipe. Once heated, the cheese melts into a creamy center that gives the rolls their rich flavor and stretchy texture.
You can use:
- Mozzarella for stretchy cheese pulls
- Cheddar for stronger cheesy flavor
- Processed cheese for creamy texture
Each type of cheese gives a slightly different taste, so you can choose according to your preference.
Butter – Golden & Flavorful Finish
Butter helps the rolls become beautifully golden and crispy in the air fryer. It also adds a rich buttery flavor that makes the snack taste even better.
Brushing butter on top creates:
- Even browning
- Crispy texture
- Better flavor
- Attractive golden color
Step-by-Step Instructions
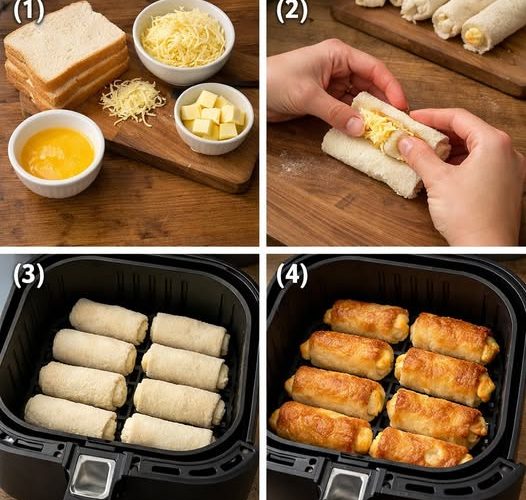
Step 1: Prepare the Bread
Start by taking fresh bread slices. Soft bread works best because it rolls easily without breaking.
Trim the crusts from the bread slices if desired. This step is optional, but it helps create smoother and softer rolls.
Now place each bread slice on a flat surface and gently flatten it using a rolling pin. Press evenly so the bread becomes thin and flexible.
Why This Step Is Important
This step may seem simple, but it plays a very important role in the recipe.
Flattening the bread:
- Helps the bread roll smoothly
- Prevents tearing or cracking
- Creates tighter rolls
- Keeps the cheese inside while cooking
If the bread is not flattened properly, the rolls may open during air frying.
Step 2: Add the Cheese Filling
Place one cheese cube near one edge of the flattened bread slice.
Do not place the cheese exactly in the center because it becomes harder to roll tightly. Keeping it near the edge makes rolling easier and gives a neat shape.
Now slowly roll the bread into a log shape while gently pressing it. Make sure the roll is tight so the cheese stays inside while cooking.
Seal the Edges Properly
Press the edges gently to close them completely.
If needed, lightly dip your finger in water and apply a little moisture on the edge before sealing. This helps the bread stick together better.
Helpful Tip
Avoid overfilling with cheese because too much filling can cause the rolls to break or leak while air frying.
Step 3: Prepare for Air Frying
Preheat your air fryer to 180°C (350°F) for 2–3 minutes.
Preheating helps the rolls start cooking immediately, which gives better crispiness and even texture.
Arrange the rolls inside the air fryer basket in a single layer. Leave a little space between each roll so hot air can circulate properly around them.
Brush each roll lightly with melted or softened butter.
Why Butter Makes a Difference
Butter is very important for achieving the perfect texture.
It helps:
- Create crispy outer coating
- Add rich flavor
- Give beautiful golden color
- Prevent dryness
Without butter, the rolls may become dry instead of crispy.
Step 4: Air Fry Until Golden Brown
Cook the rolls for 8–10 minutes.
Halfway through cooking, carefully turn the rolls so both sides cook evenly. Turning them ensures all sides become crispy and golden.
How to Know the Rolls Are Ready
Your cheese bread rolls are ready when:
- The outside becomes golden brown
- The edges feel crispy
- Cheese inside is fully melted
- The surface looks toasted and crunchy
The smell of toasted bread and melted cheese is also a good sign that they are done.
Step 5: Cool Slightly & Serve
Carefully remove the hot rolls from the air fryer basket.
Let them cool for 1–2 minutes before serving because the cheese inside will be very hot.
Serve warm to enjoy the best texture. The contrast between crispy bread and melted cheese makes these rolls incredibly delicious.
When you cut or bite into them, the melted cheese stretches beautifully, making them even more tempting.
Flavor Variations & Add-Ons
One of the best things about this recipe is that you can easily change the flavor according to your taste.
Garlic Butter Cheese Rolls
Mix finely chopped garlic or garlic powder into the melted butter before brushing the rolls.
This gives the bread a rich garlic bread flavor.
Spicy Cheese Rolls
Add:
- Chili flakes
- Green chilies
- Black pepper
inside the rolls for a spicy kick.
Herb Cheese Rolls
Sprinkle oregano, Italian seasoning, or mixed herbs inside or on top for extra flavor.
Extra Crispy Version
Roll the bread rolls in breadcrumbs before air frying for a crunchier outer layer.
Saucy Cheese Rolls
Spread a thin layer of:
- Ketchup
- Chili sauce
- Mayonnaise
inside the bread before adding cheese.
This creates a creamy and flavorful filling.
Serving Suggestions
These crispy cheese bread rolls can be served in many different ways.
Best Dips & Sauces
Serve them with:
- Ketchup
- Chili garlic sauce
- Garlic mayo
- Cheese dip
- Ranch dressing
Snack Platter Idea
Add the rolls to a snack platter with:
- French fries
- Nuggets
- Potato wedges
- Fried chicken
- Onion rings
This makes a perfect party snack combination.
Tea-Time Snack
These rolls pair perfectly with:
- Tea
- Coffee
- Cold drinks
They are especially enjoyable during rainy weather or cozy evenings.
Tips & Tricks
- Use fresh soft bread for easier rolling
- Flatten bread evenly for smooth rolls
- Seal edges properly to stop cheese from leaking
- Do not overfill with cheese
- Brush butter evenly for best crispiness
- Always preheat the air fryer
- Leave space between rolls for even cooking
- Turn halfway during cooking
- Serve immediately for best texture and cheese pull
Common Mistakes to Avoid
Not Sealing Properly
If the edges are not sealed tightly, cheese may leak out while cooking.
Using Too Much Cheese
Overfilling can break the bread or make rolling difficult.
Skipping Butter
Without butter, the rolls may not become crispy and golden.
Overcrowding the Basket
Too many rolls together block airflow and cause uneven cooking.
Using Very High Heat
High temperature may burn the bread before the cheese melts properly.
Quick Time Breakdown
| Task | Time |
|---|---|
| Prep Time | 5–7 minutes |
| Cook Time | 8–10 minutes |
| Total Time | About 15 minutes |
Storage & Reheating
Storage
These cheese bread rolls taste best when fresh and hot. However, leftovers can be stored in the refrigerator for up to 1 day in an airtight container.
Reheating Methods
Air Fryer (Best Method)
Reheat for 2–3 minutes at 180°C for crispy texture.
Oven
Bake for about 5 minutes at 180°C.
Microwave
Quick reheating option, but the bread may become softer instead of crispy.
Short Recipe
Crispy Air Fryer Cheese Bread Rolls
Description
Quick and easy crispy bread rolls filled with warm melted cheese and cooked in the air fryer until golden brown. These rolls are crunchy outside, soft inside, and perfect for tea-time, lunch boxes, parties, or late-night cravings.
Duration
- Prep Time: 5–7 minutes
- Cook Time: 8–10 minutes
- Total Time: About 15 minutes
Ingredients
- 4–6 bread slices
- 4–6 cheese cubes
- 2–3 tablespoons butter
Instructions
- Remove bread crusts if desired and flatten each slice with a rolling pin.
- Place one cheese cube near one edge of the bread.
- Roll tightly into a log shape and seal the edges properly.
- Preheat the air fryer to 180°C (350°F) for 2–3 minutes.
- Arrange rolls in a single layer inside the basket.
- Brush lightly with butter.
- Air fry for 8–10 minutes, turning halfway through cooking.
- Remove when golden brown and crispy.
- Let cool slightly and serve warm.
Tips & Tricks
- Seal the rolls tightly to prevent cheese leakage
- Brush butter evenly for crispy texture
- Do not overcrowd the air fryer basket
- Add herbs or chili flakes for extra flavor
- Serve immediately for best cheesy texture
