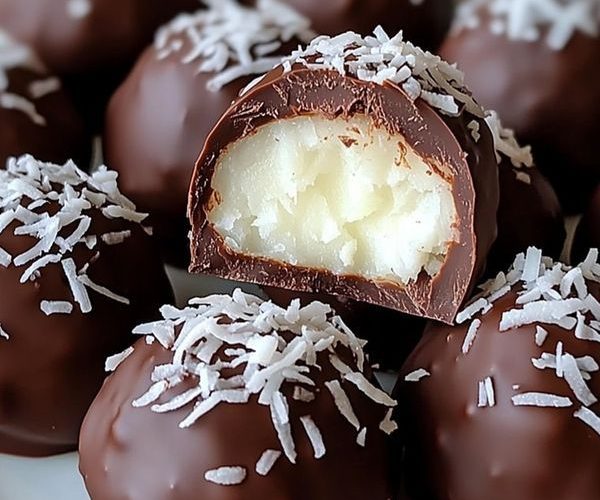
If you love the combination of coconut and dark chocolate, these Dark Chocolate Coconut Bites are a simple treat you will want to keep in the refrigerator. They are small, rich, chewy, and covered in a smooth layer of dark chocolate. The best part is that you only need a few ingredients to make them.
These little coconut bites are perfect when you want something sweet without making a full dessert. They are also easy enough for a beginner because there is no complicated baking involved. You simply blend the coconut, mix it with the other ingredients, shape the mixture into small balls, chill them, and coat them with melted chocolate.
The coconut gives the center a soft and slightly dense texture, while the chocolate coating adds a rich finish. Honey or maple syrup brings natural sweetness, and vanilla adds a gentle flavor that brings everything together.
One important ingredient in this recipe is coconut oil. It is not just added for flavor. Coconut oil becomes firm when chilled, which helps the coconut mixture hold its shape. This is especially important because the bites are made without baking. Desiccated coconut is dried and finely shredded coconut meat and is commonly used in baking and confectionery. (ScienceDirect)
Why You Will Love These Coconut Bites
There are many reasons to keep this recipe in your dessert collection.
First, it is very simple. You do not need a long list of ingredients, and there is no need to turn on the oven for the coconut mixture.
Second, the bites can be prepared ahead of time. Once they are coated in chocolate, they can be kept in the refrigerator so you have a small sweet treat ready whenever you want one.
Third, the combination of coconut and dark chocolate gives these bites a candy-like taste. The coconut center is naturally sweetened with either honey or maple syrup, while the dark chocolate gives the outside a deep chocolate flavor.
They are also small enough to serve as individual treats. Instead of cutting a large dessert into portions, you can simply make several small coconut balls and enjoy one whenever you like.
What Makes These Bites Different?
The texture is what makes this recipe special.
At first, the coconut mixture may look loose and difficult to shape. Do not worry. The mixture does not behave exactly like cookie dough. Instead of trying to roll it immediately, take a small amount and squeeze it firmly in your palm.
The pressure from your hands helps the coconut, sweetener, and coconut oil come together. After shaping, refrigeration gives the coconut oil time to become firm. That chilled texture helps the balls keep their shape while you dip them into the chocolate.
This is why the chilling step should not be skipped.
Choosing the Coconut
Use desiccated coconut for this recipe rather than regular sweetened shredded coconut.
Desiccated coconut is dried coconut that has been shredded or finely processed. It is commonly used in baking and confectionery. (ScienceDirect)
For these bites, the coconut is pulsed in a blender or food processor until it becomes very fine, almost like a thick coconut flour. This helps the coconut mixture become more compact and easier to shape.
If your coconut pieces are already very fine, you may not need to blend them for long. The goal is simply to make the texture fine enough to form a thick mixture.
Honey or Maple Syrup?
You have two choices for sweetening the coconut center: honey or maple syrup.
Both work well, but they give the finished bites a slightly different flavor.
Honey gives the coconut filling a warm, sweet taste. Maple syrup gives the filling a gentle maple flavor that works especially well with dark chocolate.
If you have both ingredients available, you can make one batch with honey and another with maple syrup. This is an easy way to see which version you prefer.
The amount remains the same either way, so there is no need to change the quantity in the recipe.
Why Coconut Oil Is Important
Coconut oil is one of the key ingredients in this recipe.
When coconut oil is chilled, it becomes firm. That characteristic is useful here because the coconut bites need something to help hold them together after shaping.
If you replace the coconut oil with another liquid oil, the mixture may not firm up in the same way. The original recipe specifically relies on coconut oil becoming firm during refrigeration.
So if you want the coconut balls to stay together, use the listed coconut oil rather than swapping it for another oil.
Coconut oil is also commonly used in baking and confectionery applications. (ScienceDirect)
Preparing the Coconut Mixture
Start by placing the desiccated coconut into a blender or food processor.
Pulse it several times until the coconut becomes very fine. You are looking for a texture similar to thick flour rather than large coconut shreds.
Transfer the processed coconut to a mixing bowl.
Add the honey or maple syrup, coconut oil, and vanilla. Stir everything together until the ingredients form a thick paste.
At this stage, the mixture should be moist enough to hold together when squeezed.
Do not expect it to behave like a smooth dough. Coconut naturally has a loose texture, so you will need to use your hands to compact it.
Shaping the Coconut Balls
Take a small portion of the mixture and place it in the palm of your hand.
Squeeze it firmly several times. This is easier than simply rolling the mixture between your palms.
Once it begins to hold together, gently shape it into a round ball.
You may notice some coconut oil on your hands while doing this. That is completely normal.
The first few balls may not look perfect. They do not need to be perfectly round. Once the chocolate is added, small differences in shape will not matter.
Continue until you have about 18 small coconut balls.
Place them on a tray or plate that will fit inside your refrigerator.
The Importance of Chilling
Put the shaped coconut balls into the refrigerator for about 30 minutes, or until they become firm.
This step allows the coconut oil to solidify and helps the bites become strong enough to handle the chocolate coating.
A useful visual clue is that you may see a small white ring of firm coconut oil around the bottom of the coconut balls. This can be a sign that the bites have chilled enough.
Do not rush this stage.
If the coconut balls are still soft, they can break apart when you try to dip them into the melted chocolate.
Melting the Dark Chocolate
While the coconut balls are chilling, prepare the dark chocolate.
Melt the chocolate slowly and gently until it becomes smooth enough to coat the coconut balls.
The important thing is to avoid overheating the chocolate. You want it melted and easy to work with, not extremely hot.
The original method uses a stainless-steel bowl placed in a hot oven for around 10 minutes because a microwave was not available. You can follow the same gentle melting approach.
Once the chocolate is smooth, set up your work area.
Place a sheet of wax paper on a tray or flat surface. This will give you somewhere to put the chocolate-covered coconut bites while the coating sets.
Coating the Coconut Bites
Now comes the fun part.
Use two forks to lift and roll each chilled coconut ball through the melted dark chocolate.
Make sure the coconut is covered all over.
Once it is coated, lift the ball with the fork and allow the extra chocolate to drip back into the bowl.
Then gently move the chocolate-covered bite onto the wax paper.
Try not to press down too hard because the coconut center may still be delicate.
Repeat the process with the remaining coconut balls.
Once all of them are covered, place the tray in the refrigerator.
Let the chocolate chill until it becomes firm.
How to Get a Better Chocolate Coating
The chocolate coating does not need to be perfectly smooth to taste delicious.
If a little chocolate pools around the bottom of a coconut bite, that is completely fine. Once chilled, it becomes part of the chocolate coating.
Using two forks makes the dipping process easier because one fork can support the bite while the other helps move it.
Allowing excess chocolate to drip off before placing the bite on the wax paper also helps prevent a very thick puddle of chocolate around each piece.
Texture and Flavor
When these bites are finished, you get several textures in one small dessert.
The inside is dense and coconut-rich. The outside is firm because of the chilled chocolate. The dark chocolate gives a stronger flavor that balances the sweetness of the coconut filling.
Honey gives the bites a warm sweetness, while maple syrup gives them a noticeable maple character.
Vanilla is used in a small amount, but it helps round out the flavor of the coconut and chocolate.
Because the recipe uses only a few ingredients, each ingredient has an important role.
Common Problem: The Mixture Will Not Form Balls
If the coconut mixture seems too loose, do not immediately add another ingredient.
First, make sure you are squeezing the mixture firmly in your palm.
The original method works better by squeezing first and then gently shaping rather than trying to roll the mixture immediately.
Also remember that your hands may warm the coconut oil as you shape the bites. This can make the mixture feel softer.
Once the bites are shaped, refrigeration is what helps them become firm.
Common Problem: The Balls Fall Apart
If the coconut balls break apart easily, they may need more time in the refrigerator.
The coconut oil needs to firm up before the bites are dipped into chocolate.
Chilling them for the full recommended time is especially important before coating.
When you remove them from the refrigerator, handle them gently.
Common Problem: Chocolate Is Too Thick
If the melted chocolate is difficult to spread, it may not be melted enough.
Warm it gently until it becomes smooth and easy to work with.
Avoid overheating it. The goal is a smooth coating consistency.
How to Store the Bites
These coconut bites should be stored in the refrigerator.
Keeping them chilled helps maintain the firm texture of the coconut center and chocolate coating.
Place them in a covered container so they stay protected and do not absorb unwanted refrigerator odors.
You can make them ahead of time and keep them ready for a quick dessert or small sweet snack.
Make Them for Different Occasions
These bites are small and easy to serve, making them suitable for many occasions.
You can prepare them for a family dessert, holiday sweet table, afternoon snack, or simple homemade treat.
They also make a nice option when you want to prepare dessert without baking a cake or cookies.
Because they can be made ahead, they are convenient when you already have several other dishes to prepare.
A Simple Homemade Chocolate Treat
One of the best things about this recipe is how uncomplicated it is.
You do not need special baking skills. You do not need to shape perfect candy pieces. You simply blend the coconut, mix the filling, squeeze it into balls, chill it, dip it in chocolate, and chill it again.
The finished bites look like little homemade truffles, but the process is much simpler.
The most important things to remember are:
- Use desiccated coconut.
- Process the coconut until it is very fine.
- Use coconut oil as listed.
- Squeeze the mixture firmly when shaping.
- Chill the coconut balls before dipping.
- Melt the chocolate slowly.
- Let excess chocolate drip away before placing each bite on wax paper.
- Chill the finished bites until the chocolate becomes firm.
Once you get comfortable with the shaping process, the recipe becomes very easy.
Honey Version or Maple Version?
If you are making these for the first time, either sweetener will work.
For a more honey-forward flavor, choose honey.
For a maple-flavored coconut bite, choose maple syrup.
The dark chocolate works with both options, so the choice mostly comes down to the flavor you prefer.
You can even make half the batch with honey and half with maple syrup if you want to compare them.
Short Recipe
Dark Chocolate Coconut Bites
Description:
These easy Dark Chocolate Coconut Bites are small, rich treats made with fine desiccated coconut, honey or maple syrup, coconut oil, vanilla, and dark chocolate. The coconut center is shaped into small balls, chilled until firm, and dipped in melted dark chocolate. The result is a simple homemade bite with a soft coconut center and a firm chocolate coating.
Yield: About 18 bites
Calories: About 130 calories per serving, as stated in the original recipe.
Duration
- Prep Time: About 15 minutes
- Chilling Time: About 30 minutes, plus additional chilling time after coating
- Chocolate Melting: About 10 minutes using the stated oven method
- Total Time: About 55 minutes or longer depending on chilling time
Ingredients
- 2 cups desiccated coconut
- 4 tablespoons honey or maple syrup
- 5 tablespoons coconut oil
- 1 teaspoon vanilla
- 4 ounces dark chocolate for melting, such as chocolate chips
Instructions
- Add the desiccated coconut to a blender or food processor. Pulse until it becomes very fine, similar to thick flour.
- Transfer the coconut to a bowl. Add the honey or maple syrup, coconut oil, and vanilla. Stir everything together until you have a thick paste.
- Use your hands to squeeze the mixture into about 18 small balls. Squeezing works better than simply rolling because the mixture may not be sticky enough at first. Shape each one gently after squeezing it together.
- Place the coconut balls in the refrigerator for about 30 minutes, or until they become firm. A small white ring of solid coconut oil around the bottom of the balls is a useful sign that they have chilled enough.
- Melt the dark chocolate slowly and gently until it becomes smooth and easy to spread. Using the stated method, place the chocolate in a stainless-steel bowl inside a hot oven for about 10 minutes.
- Place a sheet of wax paper on a tray or flat surface.
- Using two forks, carefully roll each chilled coconut ball in the melted chocolate until it is fully covered.
- Lift each chocolate-covered ball with a fork and let the extra chocolate drip off.
- Gently place each coated coconut ball onto the wax paper.
- Refrigerate the bites until the chocolate becomes firm.
- Store the finished Dark Chocolate Coconut Bites in the refrigerator.
Tips & Tricks
- Use coconut oil: Coconut oil is important because it becomes firm when chilled and helps the coconut balls hold their shape.
- Use fine coconut: Pulse the desiccated coconut until it becomes very fine for a better texture.
- Squeeze before rolling: Firmly squeeze the coconut mixture in your palm before gently shaping it into a ball.
- Do not skip chilling: The coconut balls need to become firm before you dip them in chocolate.
- Melt chocolate gently: Heat the chocolate slowly so it becomes smooth without overheating.
- Use two forks: Two forks make it easier to coat the coconut balls and let extra chocolate drip away.
- Keep refrigerated: Store the finished bites in the refrigerator so the coconut center and chocolate coating stay firm.
- Choose your sweetener: Honey gives a honey flavor, while maple syrup adds a maple taste. Both can be used in the same quantity.


