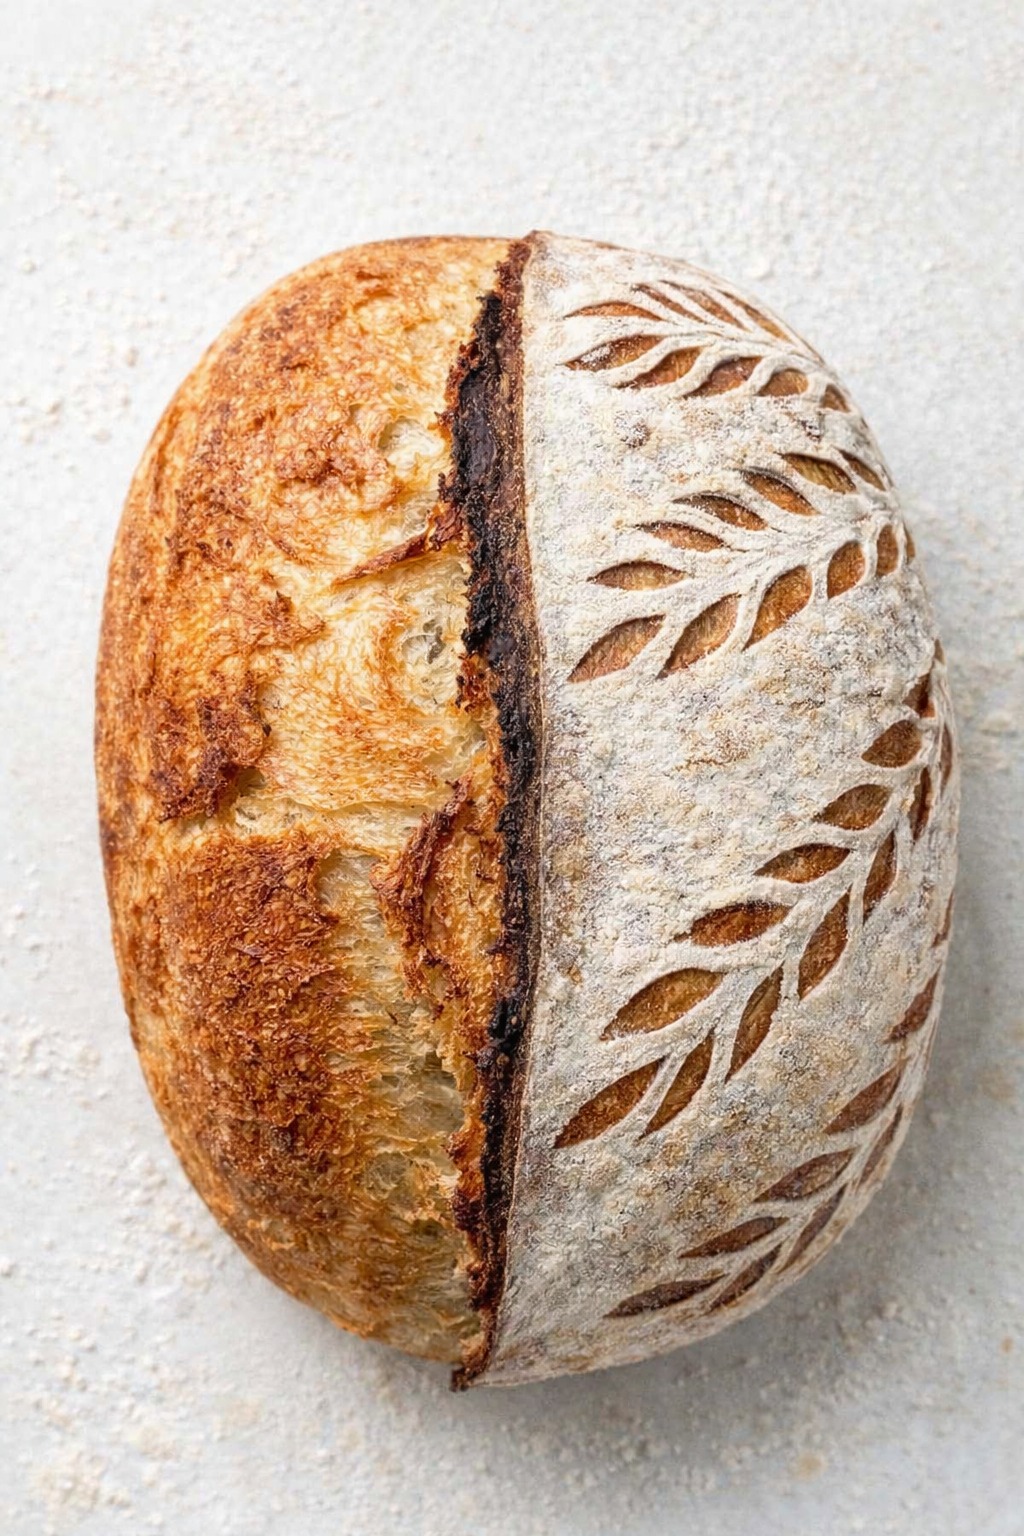
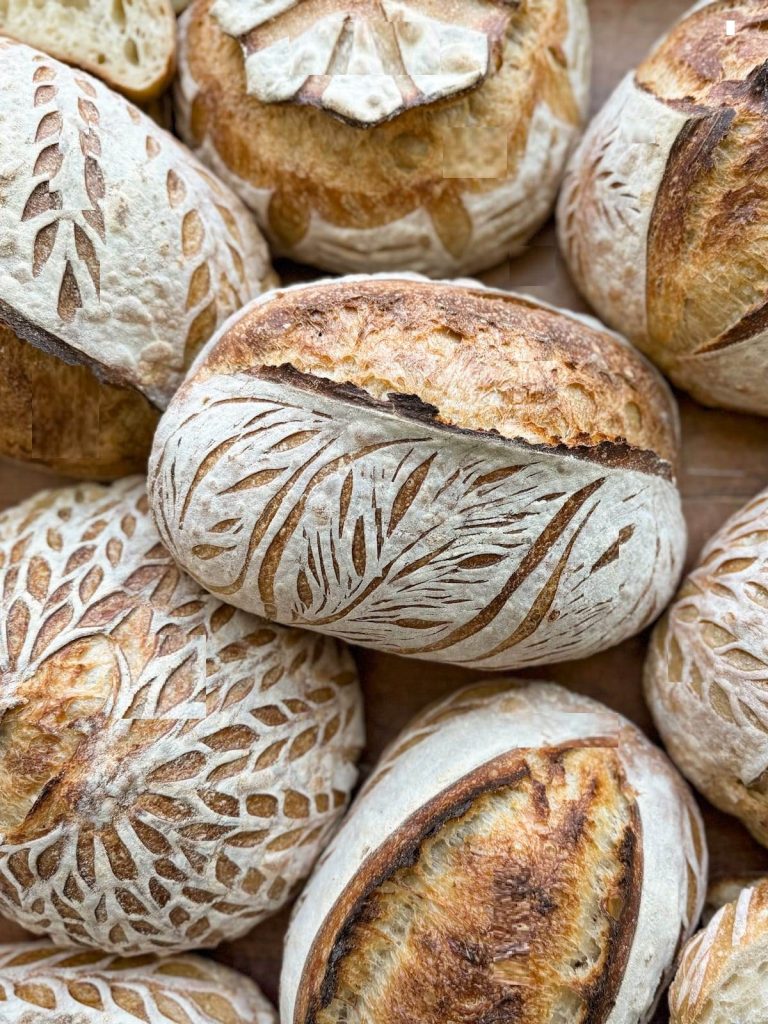
(72% Hydration – Fluffy Interior & Perfect Crispy Crust)
There is something incredibly special about baking your own sourdough bread. The smell that fills your kitchen. The golden crust that crackles as it cools. The soft, airy crumb with those beautiful open pockets inside. It’s rustic, nourishing, and deeply satisfying.
This Easy Sourdough Bread Recipe is the one you’ll come back to again and again. With a moderate hydration level of 72%, the dough is soft and pliable without being overly sticky or difficult to handle. It’s easy to mix, easy to shape, and forgiving enough for beginners—yet reliable and consistent enough for seasoned bakers.
It bakes up beautifully fluffy with the perfect balance of chew and crispiness. And one of the best parts? You have options. Bake it the same day for a mild, delicate flavor, or cold proof overnight for a deeper, more complex sourdough taste.
This truly is the everyday sourdough loaf you’ll fall in love with.
What Makes This Sourdough Recipe So Easy?
Sourdough often has a reputation for being complicated. But once you understand the rhythm of the process, it becomes one of the most natural and rewarding ways to bake bread.
Here’s why this recipe is especially approachable:
- Mixed entirely by hand in one bowl
- No stand mixer required
- Most of the time is hands-off resting
- Made primarily with bread flour, so minimal dough development is needed
- 72% hydration makes the dough manageable and easy to shape
- Flexible flour combinations
- Flexible schedule — bake same day or refrigerate overnight
- Reliable results for beginners and experienced bakers alike
This recipe is structured to build confidence. You don’t need complicated techniques. You don’t need endless kneading. You simply need patience and an understanding of the process.
If You Love Sourdough…
If you enjoy baking with sourdough, you’ll also love expanding into other recipes that use your starter in creative ways. Sourdough isn’t just for classic loaves — it can transform muffins, quick breads, stuffed rolls, and more.
Once you’re comfortable with this foundational loaf, you’ll find that sourdough baking becomes second nature — and incredibly versatile.
Beginner Sourdough Bakers – Don’t Be Intimidated
If you’re new to sourdough baking, I completely understand how overwhelming it can feel. There is so much information out there — different methods, different hydration levels, different techniques — and often they contradict each other.
Years ago, before we had countless tutorials and videos readily available, learning sourdough meant a lot of trial and error. It took time to understand fermentation, timing, and dough development. But once those core concepts click, everything becomes much simpler.
Sourdough baking is truly one of the most simple, natural, and rewarding ways to make bread. It just requires understanding what’s happening in the dough and allowing time to do the work.
Now let’s start making our bread.
Ingredients for Easy Sourdough Bread
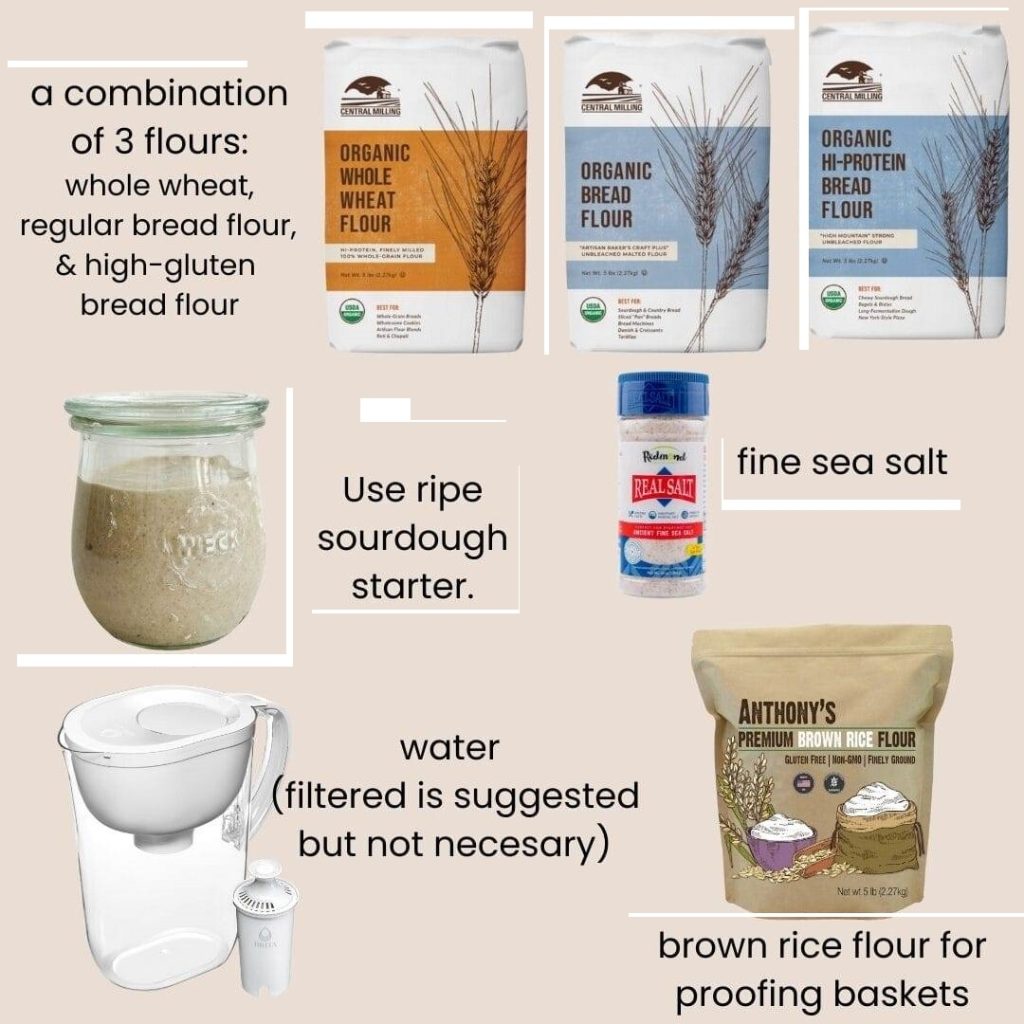
Ripe Sourdough Starter
Use your starter at peak activity. This means:
- It has doubled in size
- It looks bubbly and airy
- It smells pleasantly tangy
- The surface is slightly domed
Using your starter at peak ensures strong fermentation and good oven spring.
Water
Room temperature water (around 76°F / 24°C) works perfectly. Filtered water is recommended if your tap water contains chlorine, but it is not absolutely necessary.
Flour Combination
This recipe recommends a blend of three flours:
- Whole wheat flour
- Medium protein bread flour
- High-protein (high-gluten) bread flour
However, you can absolutely simplify and use just one bread flour if preferred.
Why This Blend Works So Well
Whole wheat flour adds:
- Nutritional value
- Extra flavor
- Beautiful color
High-protein flour adds:
- Structure
- Strength
- Better oven spring
Medium-protein flour balances:
- Texture
- Softness of crumb
- Less chewy crust
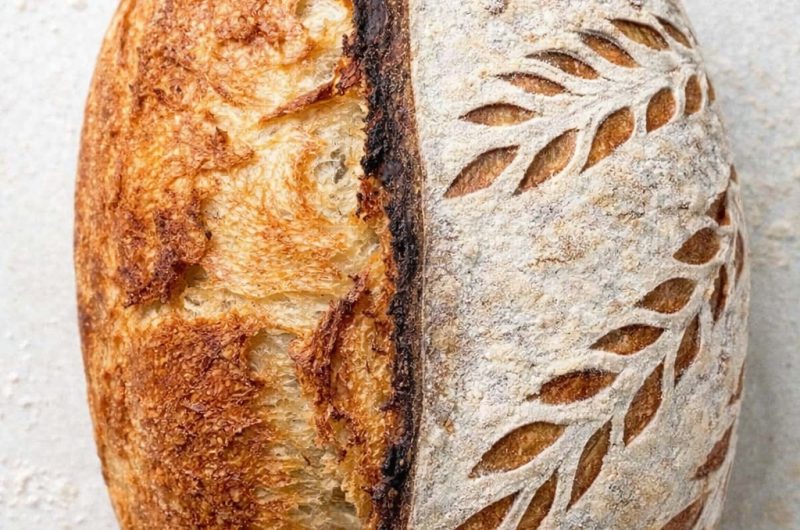
Using only high-gluten flour can create a loaf that is overly chewy or slightly gummy. Blending it with lower protein flour produces a softer crumb and a crust that’s crisp but easier to bite through.
Fine Sea Salt
Salt enhances flavor and strengthens gluten. A high-quality natural sea salt works beautifully in sourdough.
Brown Rice Flour (For Dusting)
This gluten-free flour is ideal for proofing baskets because:
- It prevents sticking
- It does not become gummy
- It does not burn during baking
It’s a small detail that makes a noticeable difference.
Flour Protein & Why It Matters
Flour protein content greatly affects the outcome of your loaf.
- Medium protein bread flour: 11%–12.4%
- High-protein bread flour: 12.5%–14%+
Protein directly impacts gluten development. Higher protein creates stronger gluten networks, which gives structure and height. But too much can lead to toughness.
Blending flours creates balance:
- Open crumb
- Tender interior
- Crisp but not tough crust
- More complex flavor
Always try to use unbleached flour. Fresh, locally sourced flour can also elevate your results.
Baking Schedule Overview
Use this as a general timeline guide. Your exact timing will vary depending on room temperature and starter activity.
If using starter directly:
- Begin mixing when your starter peaks (often morning)
If using a levain:
- You can adjust the schedule to start later in the day
Flexibility is one of the strengths of this recipe.
Step-by-Step Process
1. Mix 1 – Autolyse (45 Minutes)
Combine:
- Starter
- Most of the water (reserve a small amount)
- All flours
Mix until no dry flour remains. The dough will look rough and shaggy.
Cover and let rest for 45 minutes.
During this rest:
- Flour hydrates fully
- Gluten begins forming naturally
- Dough becomes smoother and more elastic
Autolyse improves extensibility and structure without kneading.
2. Mix 2 – Add Salt
Sprinkle salt over the dough.
Drizzle in the reserved water (about 20g) to help dissolve it.
Pinch and fold the dough until salt is fully incorporated and no granules remain.
Cover and rest.
Bulk fermentation officially begins now.
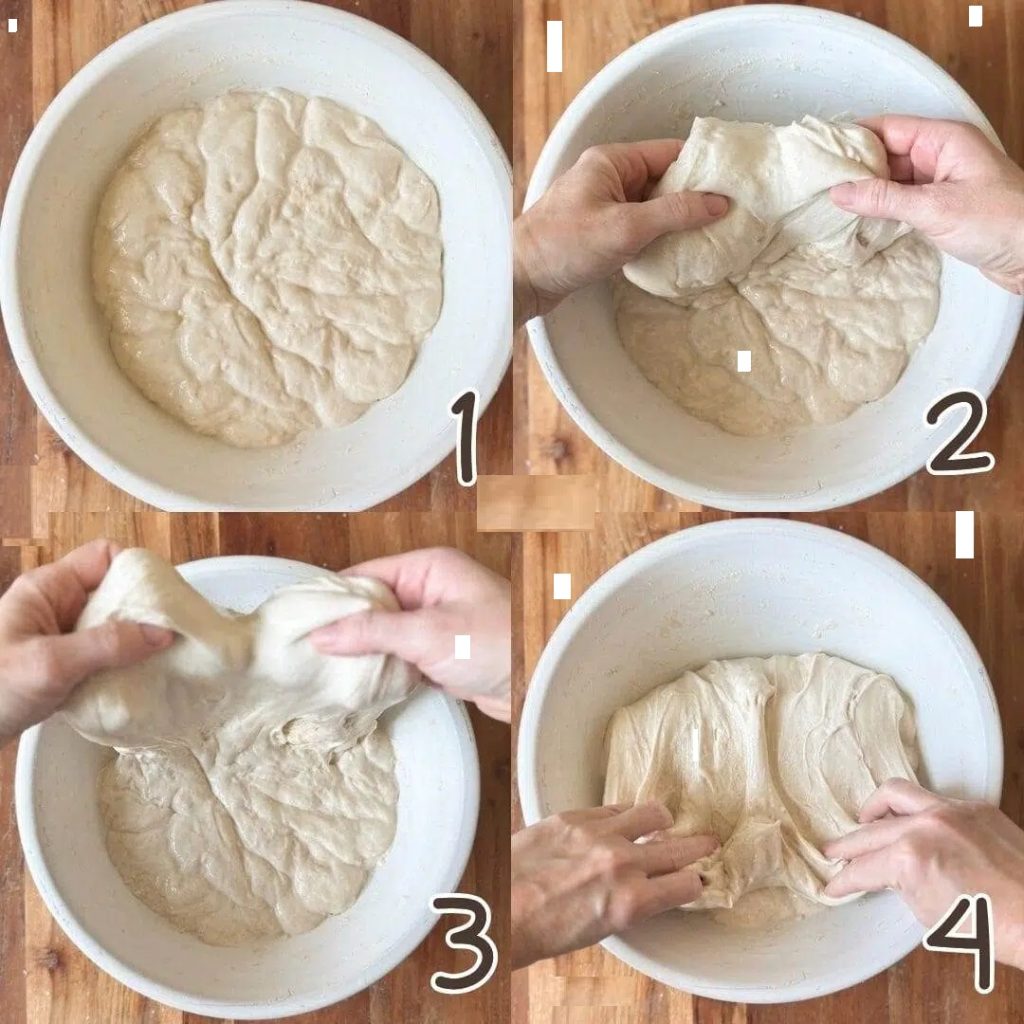
3. Bulk Fermentation & Stretch and Folds
During early bulk fermentation, develop strength through three sets of stretch and folds, spaced 40 minutes apart.
How to perform stretch and folds:
- Grab one side of the dough
- Stretch upward gently
- Fold over onto the opposite side
- Rotate bowl and repeat on all four sides
After three sets, the dough transforms dramatically:
- From loose and shaggy
- To smooth and structured
- To holding its shape beautifully
4. Finish Bulk Fermentation
Allow the dough to continue fermenting in one mass.
This stage:
- Builds flavor
- Strengthens gluten
- Creates air pockets
Knowing when bulk fermentation is complete takes practice. Look for:
- Slight rise in volume
- Visible air bubbles
- Dough that feels light but strong
Take notes each time you bake to improve your timing.
5. Pre-Shape
Divide the dough into two equal portions.
Using a bench scraper:
- Gently round each piece
- Create surface tension
Let rest uncovered for 20–30 minutes.
This rest allows gluten to relax before final shaping.
6. Final Shape
Shape into:
- Boule (round), or
- Batard (oval)
Place into linen-lined proofing baskets dusted generously with brown rice flour.
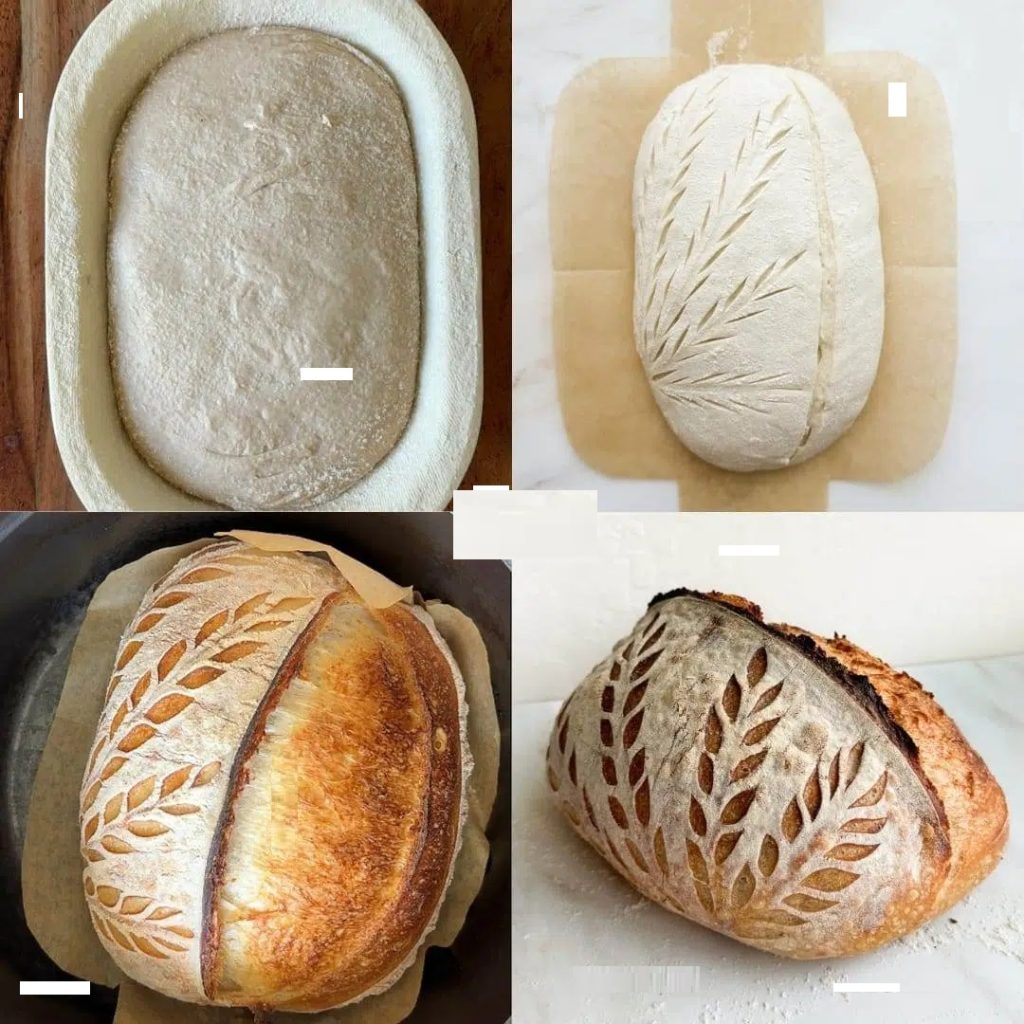
Baking in a Dutch Oven
Preheat oven with Dutch oven inside to 475°F (245°C).
- Flip dough onto parchment
- Score the surface
- Transfer into hot Dutch oven
- Cover and bake 14 minutes
- Reduce temperature to 450°F (232°C)
- Bake 14 more minutes
- Remove lid and bake 10–15 minutes until golden brown
Internal temperature should reach at least 200°F (93°C).
Cool completely (at least 2 hours) before slicing.
Same-Day Sourdough Option
For same-day baking:
- Proof at room temperature after shaping
- Time varies from 45 minutes to 2+ hours
Same-day loaves are:
- Less sour
- More mild in flavor
- Slightly tighter crumb
- More difficult to score
Use the Poke Test:
- Immediate spring back → needs more time
- No spring back → over-proofed
- Slow spring back → ready to bake
Overnight Cold Proof (Recommended)
Place shaped loaves in refrigerator 8–16 hours (up to 48 hours).
Benefits:
- More pronounced sour flavor
- More complex depth
- Crispier crust
- Easier scoring
Cold fermentation adds flexibility and flavor.
Using a Levain for Flexible Timing
A levain is a portion of starter fed separately for your recipe.
Benefits:
- Adjustable timing
- Custom flour blends
- Faster fermentation with lower feed ratios
Example:
To get 200g ripe starter:
- 70g active discard
- 70g water
- 70g flour
At a 1:1:1 ratio, it will peak in 3–5 hours.
Using a levain gives you control over your baking schedule.
Final Thoughts
This approachable, easy sourdough bread recipe delivers:
- A spongy, open crumb
- A crisp yet tender crust
- Flexible timing
- Reliable, consistent results
Whether you bake it the same day or cold proof overnight, this recipe will quickly become your favorite everyday sourdough loaf.
There is truly nothing like slicing into a homemade loaf of sourdough you created from flour, water, salt, and time.
And once you understand the process, it becomes one of the most rewarding baking experiences you’ll ever have.
Easy Sourdough Bread Recipe
20
servings35
minutes6
minutes300
kcalIngredients
Mix 1
650 gram water
200 gram ripe sourdough starter 100% hydration
85 gram whole wheat flour
815 gram unbleached bread flour *see notes for flour suggestions
- Mix 2
200 gram fine sea salt
20 gram water
- Additional
60 gram brown rice flour for flouring proofing baskets
Directions
8:00–9:00 AM — Mix 1 & Autolyse
- In a large mixing bowl, combine 650 grams of water and 200 grams of ripe sourdough starter. Use your fingers to break apart the starter until it is fully dispersed in the water.
Add:
85 grams whole wheat flour
500 grams medium-protein bread flour
315 grams high-gluten bread flour
Mix using a Danish whisk or your hands until no dry flour remains. The dough will be shaggy and slightly sticky.
Cover the bowl and allow the dough to rest for 45 minutes. This resting phase (autolyse) allows the flour to fully hydrate and jumpstarts gluten development.
9:00–9:40 AM — Add Salt & Begin Bulk Fermentation - Remove the cover. The dough should feel softer and more elastic.
Sprinkle 20 grams of fine sea salt and 20 grams of water evenly over the dough. Pinch and fold the dough until the salt and water are fully incorporated.
Cover the bowl and let rest for 40 minutes. Bulk fermentation begins at this stage.
9:40–10:20 AM — Fold 1 - Wet your hands to prevent sticking.
Lift one side of the dough, stretch it upward gently, and fold it over the center. Rotate the bowl a quarter turn and repeat. Continue until you’ve completed four stretches and folds (one on each side).
Cover and rest for 40 minutes.
10:20–11:00 AM — Fold 2 - Repeat the series of four stretches and folds.
Cover and rest for another 40 minutes.
11:00 AM — Fold 3 - Complete one final set of four stretches and folds.
Cover and allow the dough to continue bulk fermenting.
11:00 AM–1:00 PM (or longer) — Finish Bulk Fermentation - Allow the dough to ferment until it has:
Increased in volume by approximately 20–30%
Developed small bubbles on the surface
Slightly pulled away from the sides of the bowl
Developed a soft, airy feel
This can take 2 to 4 hours depending on room temperature and starter strength.
1:00–1:30 PM — Divide & Pre-Shape - Lightly wet your hands and gently loosen the dough from the bowl.
Turn the bowl upside down to release the dough onto your work surface.
Using a damp bench scraper, divide the dough into two equal portions.
Shape each piece into a loose round by gently pulling and tightening the surface against the counter.
Let rest uncovered for 30 minutes.
1:30 PM — Final Shaping - Working with one piece at a time:
Flip the dough over and shape into your desired form:
Boule (round)
Batard (oval)
Place each shaped loaf seam-side up into a rice flour-dusted proofing basket.
Cover with a plastic bag or wrap.
2:00 PM–Next Day — Overnight Cold Proof - Place the covered baskets in the refrigerator and proof overnight or up to 48 hours.
This slow fermentation:
Enhances flavor
Improves digestibility
Makes scoring easier
Produces better oven spring
Baking Instructions (Next Day) - Preheat
Place a Dutch oven on the oven rack positioned slightly below center.
Preheat oven to 475°F (245°C) for at least 30 minutes with the Dutch oven inside.
Prepare the Loaf
Remove one loaf from the refrigerator.
Place parchment paper over the basket and carefully flip the dough out onto the parchment. The loaf should now be seam-side down.
Lightly dust with rice flour and score the top as desired.
Bake
Carefully remove the hot Dutch oven and take off the lid.
Lift the loaf using the parchment and place it into the Dutch oven.
Cover and bake:
14 minutes at 475°F (245°C)
Without opening the oven:
Reduce temperature to 450°F (232°C)
Bake another 14 minutes
Remove the lid and bake an additional 10–15 minutes until the crust is deep golden brown.
Cool
Transfer the loaf to a wire rack.
Allow to cool completely (at least 2 hours) before slicing. Cutting too early may result in a gummy interior.
Repeat with the second loaf.
Notes
- Flour Notes
Bread flour protein levels vary by brand.
High-protein/high-gluten flour → Easier dough handling, thicker and chewier crust
Lower-protein bread flour → Softer crust, slightly wetter dough
If using lower-protein flour, you may need to slightly reduce the water.
Whole Wheat Variations
You may replace whole wheat flour with more bread flour.
You may increase whole wheat flour for more flavor and nutrition.
The more whole grain flour added, the denser the loaf.
If increasing whole grains, you may need to add slightly more water.
You can substitute other whole grain flours as well.
Same-Day Baking Option
After final shaping, allow loaves to proof at room temperature until they pass the poke test (30 minutes to 2 hours depending on temperature).
Preheat oven during the final 30 minutes of proofing.
Refrigerate one loaf while baking the first to prevent over-proofing.
Reheat Dutch oven back to 475°F before baking the second loaf.
Prevent Burning
If available, place a baking stone on the bottom rack during preheating. This helps prevent the bottom crust from burning.


Pingback: Sourdough Dinner Rolls – Dishes.Cookingpoint